Installing Drupal on XAMPP in the community in your pc

Drupal is an open source content material management platform. You need to use Drupal to build massive and powerful web sites and net functions comparable to online Newspapers, E-commerce stores, organization Portals, company Intranet, Multi-person Blogs, Social Networks, and way more. Drupal is enormous and it's attain is colossal. If that you may imagine a content pushed internet site, you could make it with Drupal.
Drupal shouldn't be like other content material management techniques, for instance WordPress, which is traditionally used by men and women as a running a blog platform. Drupal is not only a easy content administration framework constructed for doing one factor. It's totally flexible and extendable, enabling us to construct internet sites for certain wishes.
Drupal has a brilliant community of builders, themers, and contributors. Drupal is evolving every day and on account that of this awesome neighborhood, hundreds of thousands of modules (Modules lengthen the functionalities of Drupal), topics, and distributions had been contributed to Drupal.
If you want to be taught Drupal, which is a nice factor to do, you will first have to install it. In this tutorial, we're going to exhibit you learn how to install Drupal 7 on XAMPP in easy steps with screenshots.
You need to have XAMPP established in your pc with a view to comply with through the steps outlined on this tutorial. If you do not need XAMPP established, visit here for an academic on installing XAMPP on home windows.
Let's appear at how to install Drupal 7 on XAMPP
Even though i am applying Drupal 7. 23 for this course, the idea is useful for just about any minor Drupal 7. xx edition.
Drupal 7 involves MySQL 5. 0. 15 or more having PDO or PostgreSQL 8. 3 or more having PDO or SQLite 3. 3. 7 or more which are contained in the most recent edition involving XAMPP, and so you don't need to install these individuals separately.
1) Download Drupal
Go to https://drupal.org/project/drupal, and download the latest recommended release of Drupal.
2) Extract the contents
Following getting Drupal, draw out your contents of the downloadable file on your hard drive. Depending on the version you have downloadable, your taken contents needs to be inside a folder called because “drupal-x. y”.Change your brand of the folder. In this tutorial, i am naming your folder because “drupal”. That folder is going to be necessary later on in this particular tutorial.
3) Create a Database
Now, we need to create a database for Drupal. Drupal requires a database to store some configuration settings and user's content. Go here to see how to create a database using phpMyAdmin. We created a database with “drupal_db” as its name.
4) Keep Drupal in the "htdocs" folder of XAMPP
The "drupal" folder should be kept inside the XAMPP's "htdocs" folder. To do this, copy the “drupal” folder which was mentioned in step 2, and paste it inside the “htdocs” folder. Generally, the “htdocs” folder is found at “C:\xampp\htdocs”.
The folder path should look like “C:\xampp\htdocs\drupal”.
You can see the contents of the "drupal" folder.

5) Begin a browser as well as check out "localhost/drupal".
Ensure that Apache in addition to MySQL are generally managing with XAMPP. Generate “localhost/drupal” from the target club in the visitor, in addition to press the Enter key. The actual visitor is going to be rerouted to help “localhost/drupal/install. php”.You will notice the webpage as revealed below.
Below, you can choose 1 from your two selections -- Typical installing user profile or maybe Minimal installing user profile. Most of us recommend that you ultimately choose the normal user profile. It sets up drupal together with widely used attributes which might be pre-configured.
Click “ Preserve in addition to continue” button.

6) Choose language
Now, from the web site seeing that revealed below, you will see the particular default words is actually Uk. In this particular short training, were using the default words Uk.Click “Save along with continue”.

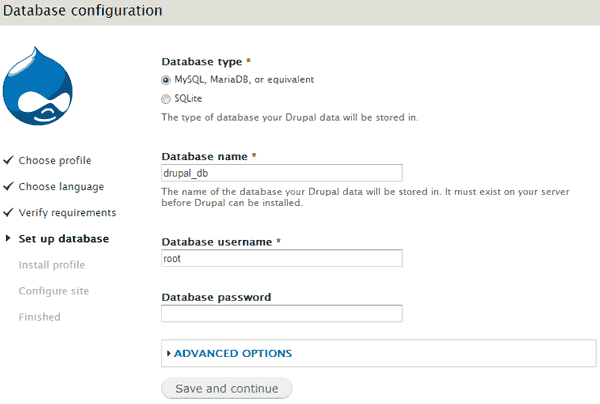
7) Enter Database Configuration details
You will see the “Database configuration” page as shown below. Enter the database configuration details created in step 7.
- For the field "Database type", choose "MySQL, MariaDB, or equivalent".
- In the field "Database name", write the name of the database which you have created in step 3.
- In the field "Database username", write the user name associated with the database which you have created in step 7. You can use the MySQL SuperUser "root".
- In the field "Database password", write the password associated with the "Database username". If you are using "root" as the "Database username" and the associated password was not changed, keep the “Password” field blank. (You can find the XAMPP MySQL security settings here http://localhost/security/xamppsecurity.php. You can change the language at http://localhost/security/index.php)
- In the "ADVANCED OPTIONS" section, there is no need to change anything.
Click on "Save and continue". This will start installing Drupal.
If the "Database configuration" page as shown above is not displayed, and you see any error related to the "settings.php" file or file permissions, see the Note below.
[Note: During the installation process, Drupal will try to automatically create a “settings.php” configuration file in the folder “C:\xampp\htdocs\drupal\sites\default”.
Generally, “settings.php” file will be created without any problem during the installation process, and you don't need to create it manually.
If “settings.php” file creation fails, you will need to create this file manually in the folder “C:\xampp\htdocs\drupal\sites\default”.
To create the “settings.php” file:
Make a copy of the file “default.settings.php” located at “C:\xampp\htdocs\drupal\sites\default”, and name the copied file as “settings.php”. Keep the file “settings.php” in the same location “C:\xampp\htdocs\drupal\sites\default”.
To do it easily, open the file “default.settings.php” which is located at “C:\xampp\htdocs\drupal\sites\default” in a text editor. Save it as “settings.php”. After saving, you will have both the “default.settings.php” file and the “settings.php” file in the folder “C:\xampp\htdocs\drupal\sites\default”.
After the installation has completed, the file “settings.php” must be made “Read-only” for security of your site. To make “settings.php” a “Read-only” file: Right-click on the file, select “Properties” in the context menu. Check “Read-only” in the Attributes section, then click OK.]
8) Installation progress
You will see the installation progress page as shown below.
After the installation progress completes, the “SITE INFORMATION” page is displayed as shown below.
Enter the site configuration details.
- Write the “Site name”and the “Site e-mail address”.
- Write the “Username” for the administrator account.
- Write the “E-mail address” of the administrator.
- Enter administrator password in “Password” and “Confirm password” fields.
- Choose “Default country” and “Default time zone”.
- You can choose to check for updates automatically and to receive e-mail notifications.


9) Installation completed
You will see the “Drupal installation complete” page as shown below.
Click on “Visit your new site” link.

You will see your Drupal site's home page as shown below.

Today, you can configure as well as pattern your blog with all the wonderful features connected with Drupal.
Posted by
Unknown
